

Remote assistance
 Available to existing customers or new customers local to the Tavistock area. Please call 01822 810799 for more information.
Do not click on the Logmein link unless requested to do so by RDCS.

Alternatively you can use Join.me : Instant desktop sharing.
Unable to start Windows (XP, Vista, Windows 7)
If your PC gets to the point of loading Windows then suddenly reboots then the following has occurred:
- a recent change in software - causing registry corruption. Note: The registry contains all the information necessary to run Windows and your applications.
- a recent change in a driver.
- disk error
- virus/trojan
Try to start the system in safe mode - repeatedly press F8 when the system is starting until a menu appears giving options for recovery.
Attempt recovery in the following order (XP, Vista & Windows 7)
- F8 - Last known good configuration - restart system - if system fails to start normally then:
- F8 - (Vista/W7 only) - repair system - follow prompts - restart system - if this fails normally then:
- F8 - Safe mode - if this works then select system restore from Start - Program Files/application data/system tools/system restore - select an earlier restore point (last known good configuration uses the last system restore point so you will need to try further back) - if the fails to start normally then:
- F8 - Diagnostic startup.
- Vista/W7 (click Start - type 'msconfig' in the search box then enter).
- XP (Click Start - run - type 'msconfig').
- Both - Select services - hide all Microsoft services - apply. Select startup - disable all - apply. Reboot system. If this fails:
- F8 - Safe mode but this time carry out a disk check. This can be done two ways.
- Safe mode
- Using Windows Installation CD.
- F8 - Safe Mode. Open my computer - right click C: drive - left click properties - tools - check disk (tick both boxes) - a message will appear saying that the disk is locked and the check will be performed at the next boot up - accept message then reboot. If the system fails to start normally after the check then
- Windows Installation CD
Start the system with the Windows installation CD (the CD drive must be selected as first boot device in the BIOS). Select R (Repair). A black box with white writing will appear asking for the Adminstrator password (only required if configured when Windows originally installed) - follow prompts. At the prompt type chkdsk c: /f
If all this fails then a workshop repair is required.
Windows 10 recovery
If you've used Windows 8 or Windows 8.1 for a while, you might have noticed that the "old ways" of booting into Safe Mode no longer work. By that, we mean trying things like pressing the F8 or Shift + F8 keys on your keyboard while booting. These methods stopped working in normal cases because the boot procedure became faster than ever before. The same is true when we're talking about Windows 10. Such actions don't work. But that doesn't mean Windows 10 has no Safe Mode. It's just that to get to it, you have to follow other procedures. Let's take a closer look and see how you can get into Safe Mode in Windows 10.
Safe Mode In Windows 10
Safe Mode in Windows 10 is very similar with what we've seen in Windows 8 or Windows 8.1.
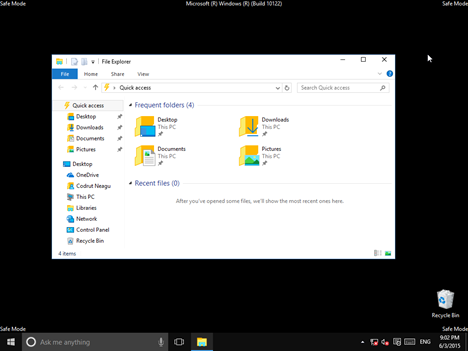
Windows 10 loads a minimal interface, with only the essential services and drivers needed for it to function.
1. Use The System Configuration Tool (msconfig.exe)
One of the easiest methods to boot into Safe Mode in Windows 10 is to use the System Configuration tool. Many users know this tool by its executable name: msconfig.exe.
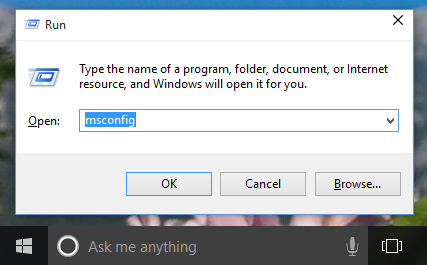
The fastest way to launch System Configuration in Windows 10 is to use the Run window. To do that, simultaneously press the Windows + R keys on your keyboard. Then, write msconfig in the text field and press Enter or OK.
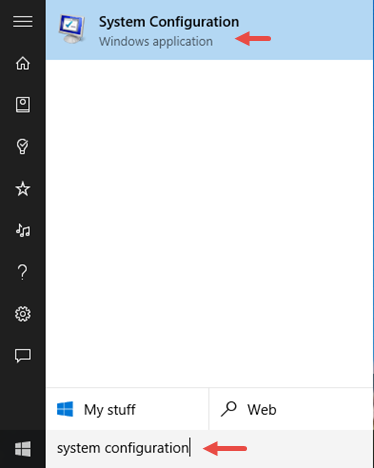
Another way of opening the System Configuration Tool is to use Cortana. In Cortana's search field, enter the words "system configuration". Then click or tap on the System Configuration Tool app.
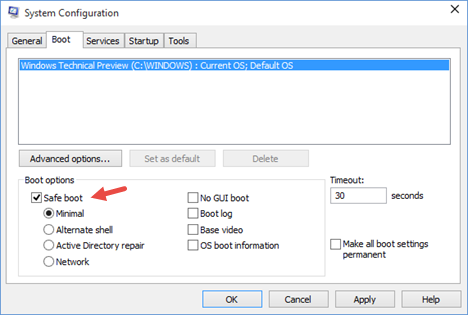
Switch to the Boot tab and, in the Boot options section, select the Safe boot option. Then, click or tap on OK.
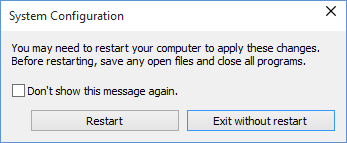
Windows 10 will tell you that you need to reboot your device in order for the new setting to take effect. If you still have work to do, you can select to "Exit without restart". If not, you can restart now and your device will automatically boot into Safe Mode.
2. Use the Shift + Restart combination
Another way of getting into Safe Mode in Windows 10 is to use the Shift + Restart combination. Open the Start menu and click or tap on the Power button.
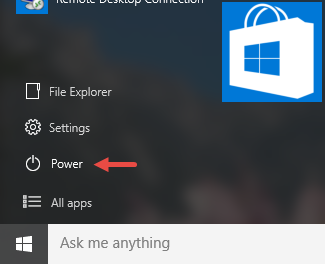
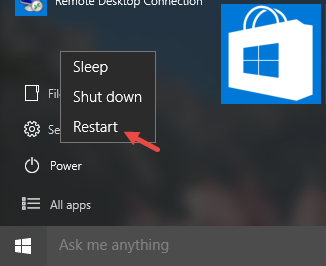
Then, while keeping the Shift key pressed, click or tap on Restart.
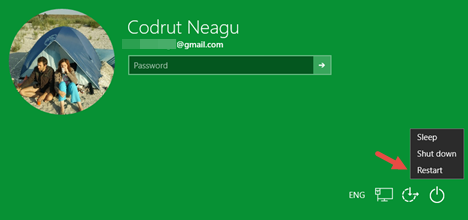
Note that you can also use the Shift + Restart combination from the Sign In screen.
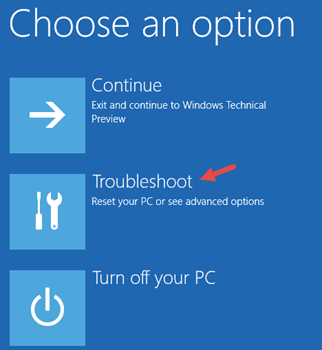
Then, Windows 10 will reboot and ask you to select an option. Choose Troubleshoot.
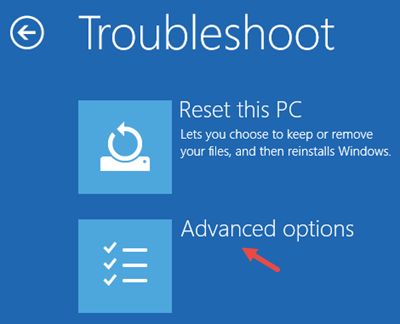
Then, on the Troubleshoot screen, select Advanced options.
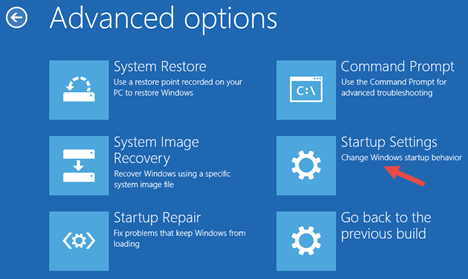
On the Advanced options screen, choose Startup Settings.
Windows 10 notifies you that you can restart your device in order to change advanced boot options, including enabling Safe Mode. Press Restart.
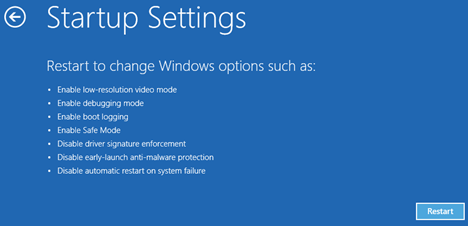
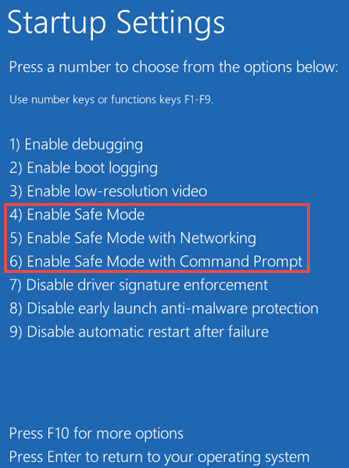
After Windows 10 reboots, you can choose which boot options you want enabled. To get into Safe Mode, you have three different options. To enable Safe Mode press the F4 key on your keyboard, to enable Safe Mode with Networking press F5 and to enable Safe Mode with Command Prompt press F6.
3. Boot From A Recovery Drive
In Windows 10 you can use the Recovery Drive app to create a system recovery USB drive.
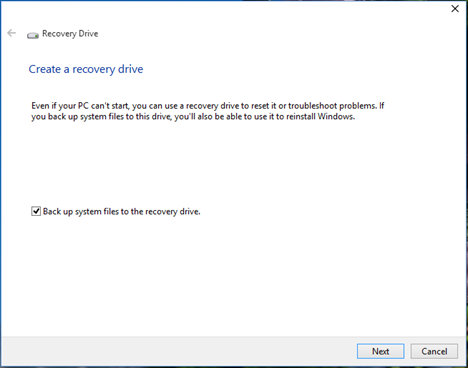
Once you have created a USB recovery drive, use it to boot your Windows 10 device and, when you're asked to load its content, do so.
The first screen will ask you to choose the layout for your keyboard. Select the one you want to use, or if you don't see it listed, press on "See more keyboard layouts" to get the complete list of available layouts.

Once you chose your keyboard layout, on the Choose an option screen, select Troubleshoot.
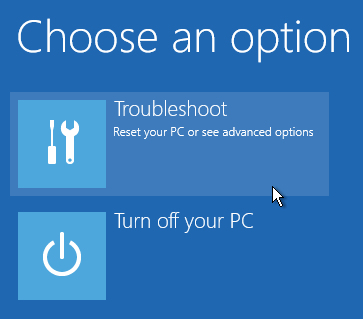
The following steps you need to make in order to boot into Safe Mode are the same ones we showed in the second method from this guide.
4. Use F8 or Shift + F8 (doesn't work when using UEFI BIOS & SSDs)
In Windows 7, you were able to press F8 just before Windows got loaded, to open the Advanced Boot Options window, where you could choose to start Windows 7 in Safe Mode.
Some websites advise you to press Shift+F8, just before Windows starts loading so that you make it start the recovery mode, from where you can boot into Safe Mode. The problem is that, most times, Shift+F8 and F8 don't work, even though they are correct commands, supported by Windows 10.
This official blog post from Microsoft (Designing for PCs that boot faster than ever before) explains that this behavior is caused by their work in designing a very fast boot procedure. Both Windows 8.1 and Windows 10 have the fastest boot times ever. To quote Steve Sinofsky:
"Windows 8 has a problem – it really can boot up too quickly. So quickly, in fact, that there is no longer time for anything to interrupt boot. When you turn on a Windows 8 PC, there's no longer long enough to detect keystrokes like F2 or F8, much less time to read a message such as "Press F2 for Setup." For the first time in decades, you will no longer be able to interrupt boot and tell your PC to do anything different than what it was already expecting to do."
If you have modern PC with a UEFI BIOS and a fast SSD drive, there's no way you can interrupt the boot procedure with your keypresses. On older PCs, with a classic BIOS and no SSD drive, pressing these keys might still work though.
Conclusion
Windows 10 is a fast operating system with a fast boot process. Getting into Safe Mode might not work like in older Windows operating systems, but the methods available are similar to the ones in Windows 8 or Windows 8.1.
Quick guide to Healthy Computing
 Recovery & backup
Most computers (PC's and laptops) purchased on the High Street don't have any recovery media and put the onus on you to create a set of recovery DVD's. In the event of disk corruption or a corrupted Windows installation without recovery media, the repair becomes very time consuming. Ensure you have a full system backup or better still, a system image to avoid a dilemma becoming a tragedy. All RDCS computers have original Genuine software and a recovery partition thereby having two methods of recovery.
If you need help with configuring your built in Windows 7 backup then click on the following link:
http://windows.microsoft.com/is-IS/windows7/products/features/backup-and-restore
Windows Security
Keep Windows in date for critical updates monthly - Do this by logging onto the internet and then selecting Tools - Windows update (XP) or START - All programs - windows update for Windows 7. You will be directed to the Windows website - select 'Scan for Update'. Revue and install all critical patches that are automatically selected. Windows XP with Service Patch 2 will automatically install updates and prompt you when they are ready to be installed. Vista is currently at Service Patch 2. XP is at Service Patch 4. Windows 7 is at Service Patch 1. Windows XP (SP2) onwareds contains its own Firewall. Service patch 2 contains improved security and switches on the Firewall by default and prompts you if your security settings are incorrect - therefore check that XP is at least SP2 (this information is shown by right clicking my computer, left click properties.)
Windows Vista, 7 and 8 should automatically check and install updates but worth checking by selected Start-All programs-Windows update.
Anti-virus
Check your Anti-virus has the latest update. Most AV will automatically check for and install updates when you are connected to the internet. Better products like Kaspersky check hourly for updates.
tip: If you have a USB ADSL modem and only use the internet for email using Outlook Express or another mail client and have the setting 'hang up after send receive' enabled, your PC may not have enough time to update its security or anti-virus signatures because the connection to the internet is only open as long as it takes to send and receive mail. Therefore, if you receive an infected email and your protection is not in date, your PC may be at risk. To combat this simply connect to the internet using Internet Explorer, then open your Anti-virus program and select 'update' before you open your email program. You can also remove the 'hang up after send receive' setting (open Outlook Express, select tools, options, connection, un-tick 'hang up after send receive'.) If using a dial up modem you will need to manually disconnect from the internet or you might find yourself with a hefty telephone bill.
If using a router, ensure it is switched on and connected to the internet prior to connecting/switching on your PC.
Click here for the Latest Virus threats
Firewall
Windows 7/8, Vista and XP (from SP2) have their own built in firewall which provides some protection. Internet Security products such as Norton Internet Security, Kaspersky Internet Security etc override the Windows firewall for a more detailed and effective protection, especially when browsing the web. Ensure your firewall and AV start-up each time you start Windows. Therefore you need to know if the your Windows firewall is on or Internet Security is working correctly. Kaspersky makes this easy by warning you if something is not running with a simple button named 'fix me'.
You can check your security (exposure to viruses/hacking) by using the Kaspersky online-scanner - click here
Free Software – Spy ware / Malware
Avoid free software unless you can be sure of its content. Be wary of free program downloads on the internet as it may contain spyware/malware which if unchecked can cause more damage to your system than a virus.
Update and run your spy-ware remover program eg Microsoft Defender, Malwarebytes, Ad-aware SE / Spybot Search and Destroy every 2-3 weeks. Make sure your Anti-virus application is the latest version (older versions do not protect you from spyware.) Quarantine or delete all objects detected (if using Windows ME or XP create a restore point before removing spyware.)
Even if you have Internet Security or Anti-virus installed it is still worth checking your system with another anti-spyware/malware product but don't install TWO anti-virus programs as these will clash.
Defragment
Defragment every 2-3 weeks. Tip. It is quicker to do this in safe mode (if using Windows 98, ME or XP) (Windows without start-up drivers) do this by selecting F8 when you boot the PC (keep pressing until a menu appears). Select safe mode. Note: No graphics driver will be loaded and you will have to reposition your desktop icons when you later reboot back into Windows.
Windows Vista and newer Operating Systems are scheduled automatically to defragment at midnight every Wednesday. Consider changing the scheduled time to a time when your machine will be on and not in use.
System Restore
Create a system restore point prior to installing any new software or hardware (ME and XP), Vista/Windows 7/8 does this automatically, but it's worth checking that it is working. If things should go wrong after the installation use the last restore point to repair the system. System restore can be found on the start menu under all programs - accessories - system tools.
Driver Updates
Check for updates for your hardware/software by logging onto the respective manufacturer’s website e.g. HP, Epson etc. Locate your product (usually under support or downloads). Note: Some downloads may be large therefore don't attempt this if using a dial up connection. We can help.